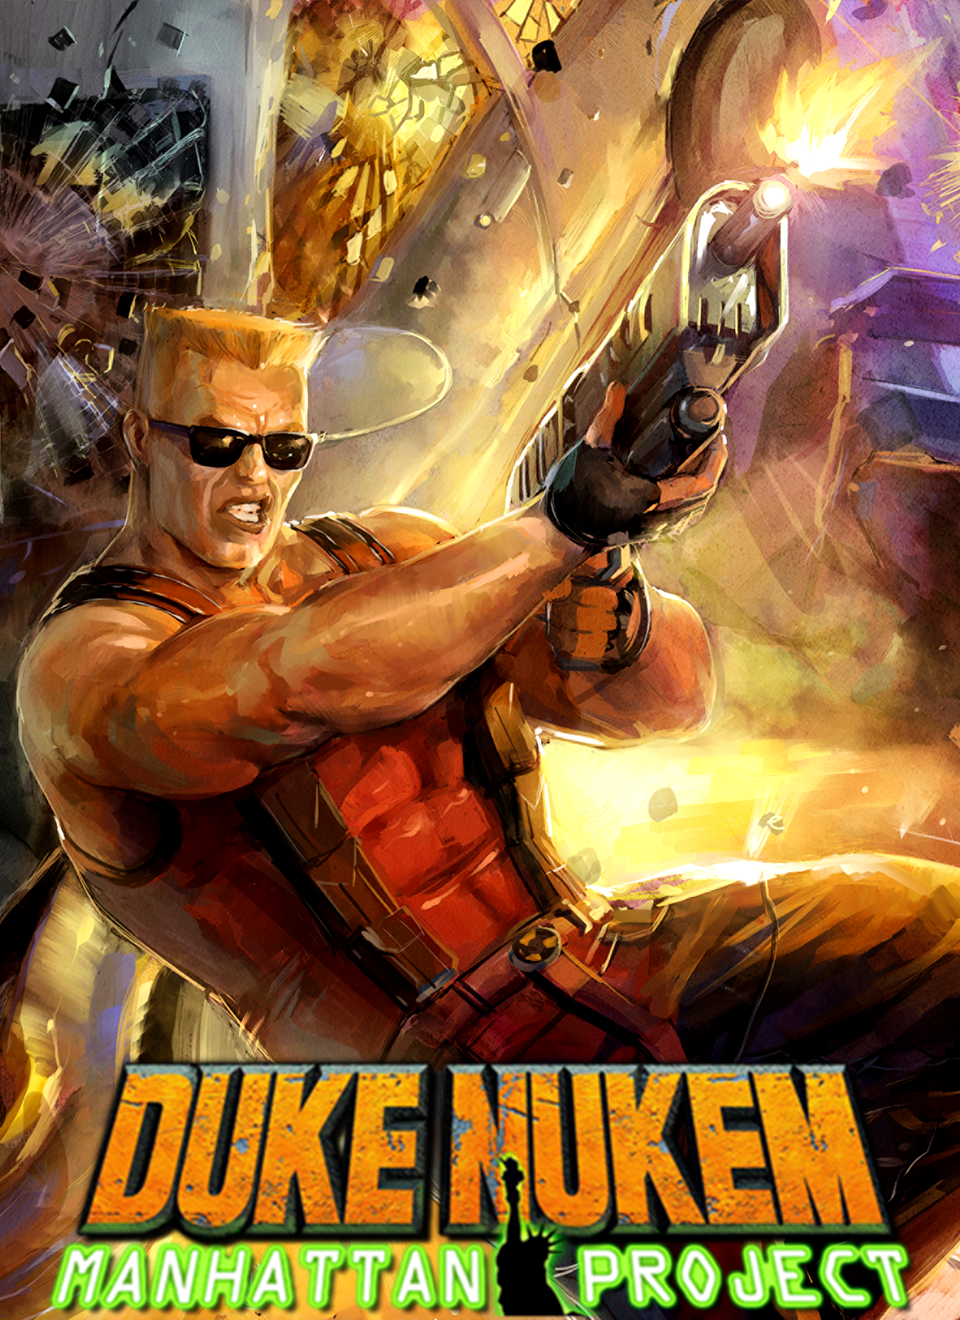
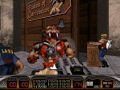
Duke Nukem takes his Mighty Boot to the Big Apple. Using GLOPP (Gluon Liquid Omega-Phased Plasma), the maniacal mech Morphix has transformed the creatures of New York City into an army of bloodthirsty mutants. In Duke Nukem: Manhattan Project, Duke must deploy WIN (Weapons, Insults and Name-Calling) to rid the city of goo-based bad guys, and return peace and tranquility to The City That Never Sleeps. Originally released to commemorate the 10th anniversary of Duke Nukem in 2002, Duke Nukem: Manhattan Project blends together the best elements of Duke Nukem 3D and the best 2D sidescrolling of the first two games in the series, Duke Nukem and Duke Nukem II. Return to a time when the King of Action didn’t need regenerative health or auto-aim - a time when action games were actually about action, an era when heroes had the strength to carry as many guns as they wanted and use as many cheats as they needed.

Articles
This is a tutorial for Duke Nukem Manhattan Project's level editor. Created by SCS soft the developer of the game's engine. It has been mirrored here because it has been removed from the developer's website.
Prism3D editor & Duke Nukem: Manhattan Project
Disclaimer:
This is unsupported barebones tutorial on Prism3D level editor usage. Use at your own risk. It's compiled from several pieces of old documentation and is far from complete, there may be gaping holes in it or incosistencies because the material was pulled out of the original context, but it's still better to have something to start with than to have nothing at all.
1. Seting stuff up
- IMPORTANT: Make sure you read the first FAQ question towards the end of this page before you continue!
- Install the game from the CD (remember, no spaces in the path if you want to use the dev tools)
- Download and install the game patch to version 1.0.1 from here
- Download the editor patch that will replace the executable to be compatible with version 1.0.1, again from here
- Copy this file (named dnmp_editor_101.zip) into the folder where DNMP was installed (you are not using the default "C:/Program Files/Duke Nukem - Manhattan Project" right? Those darn spaces remember....) and unzip the contents into this folder
- You should be set up!
- To verify this, launch the prismed.exe file in your DNMP folder, this is the editor executable.
- Select File->Open, and locate the folder duke/map_src in your DNMP directory.
- Choose a map, let's say demo_area_teleport.vex, and open it.
- wireframe view of the map will appear in the 4 view panes, as well as list of brushes and entities the map is constructed of in the "group manager" bar on the right.
- Select the File->Build Map (or press the "globe" button on the toolbar).
- Leave the default settings intact, and press the "Build & Run" in the middle of the herd of buttons at the bottom of the dialog.
- the map should be quickly converted (compiled) into the binary form that the engine understands, and immediately after that the engine will be started and the map will be launched.
- take a look at the map.
- quit the engine, you will be sent back to the editor.
2. General Prism3D level editor concepts
Introduction to PrismEd
This document tries to explain some basic concepts behind level creation in Prism3D and things to keep in mind while doing so. The intended audience is primarily level designers, though it may contain useful bits of info that both programmers and texture artists could find useful.
PrismEd is the level design editor component of the Prism3D engine suite. Other components include (in addition the the engine itself) several additional tools - model tweak tools PSM Lab and PMD Lab for working with models exported from 3DSMAX, Shader Lab for working with and previewing shaders, UI Builder for designing game interfaces, and the level compilation tool - Builder. Prism3D engine uses proprietary binary format to store the maps that represent game levels. The level designer works with PrismEd, and to run the map he created, first it must be compiled into the binary format using the builder. This is done by using the File -> Build map command, or by pressing the F9 hotkey, or by clicking on the Build Map icon.
![]()
Build Map Icon
But before we get as far as compiling and running the level in the engine, first we need to construct a level in the editor, which is covered in this document.
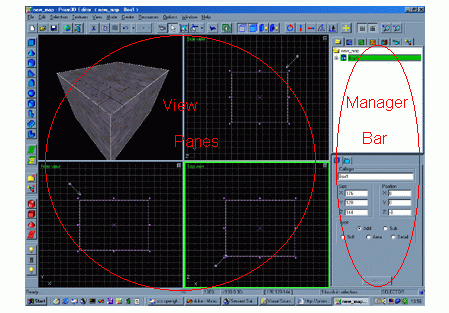
When you launch the editor, you will be confronted with several interface elements that you need to get comfortable with. The largest area is occupied by the top, front, side and 3D view panes. Around the view panes, there are several button toolbars and so called "manager bar".
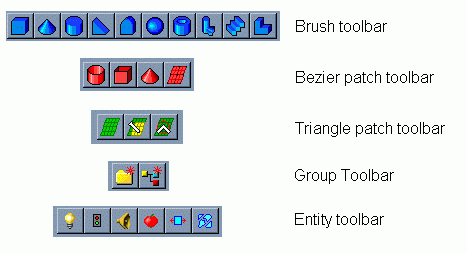
Note that toolbars can be undocked and docked to places you prefer or hidden if you prefer to work with menu commands (all buttons are basically shortcuts that are accessible through the menus too). The Entity toolbar look is just an example look, it's possible to reconfigure what entities are displayed there using the Options -> Entity toolbar command. You may find this quite handy later in level design when you add a lot of entities of the same type.
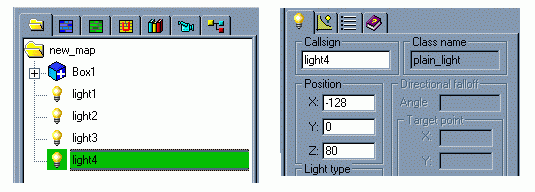
top part of the Manager Bar with Groupman tab active on the left, top part of Selection Properties Box on the right
On the right side of the screen (though it can be dragged elsewhere if desired) there is a big area called the Manager Bar
In the upper half of the Manger Bar, there are several tabs that give you access to tree-view of the map hierarchy (this tab, the "groupman" tab, is active in the picture above), and the other useful tabs that are worth mentioning now are tabs allowing you to browse through shaders. In the lower half of the Manager bar, there is always a bunch of tabs listing properties of currently selected items. Note that the selected item(s) is(are) highlighted in groupman by the green color stripe.

Modes toolbar on the left, 3D look toolbar on the right
The editor can be switched to several operation modes (see picture above on the left for reference):
- camera mode - will show the 3D views camera position and orientation in the other 2D views, you can drag it elsewhere; usefull for changing the 3D view camera position by vast distances
- Universal selection mode - you will spend a lot of time in this mode, basically doing tasks like moving things around or resizing them etc.
- Face mode - allows you to select individual faces of brushes and triangle patches for setting their properties like shader, scale, rotation, collision properties etc. etc.
- Vertex mode - lets you select individual vertices of elements and drag them around
- Axis lock - "dropdown" control where you can select the axis along which movement will happen in 3D view when manipulating vertices and shaping tripatches
- "fly mode" - when switched on, the controls of the 3D view (must be active) will switch to "smooth fly" operation, however many editor shortcuts keys won't work!
- Select-by-center mode - decides whether elements like brushes can be selected by clicking anywhere in their area, or only by clicking their center point
3D view look styles (see picture above on the right for reference):
- plain wireframe view
- textured view, can take a while to update if you change any of the geometry
- textured and lit preview (without shadows), can take a longer while to update during changes. You need lights in the scene to see anything!
- textured and lit preview including shadows, can take even longer to update. You need lights in the scene to see anything!
Level creation concepts
Prism3D engine and the associated editing tools offer similar features and functionality to other competing 3D engine suites available. Prism3D engine can deal with both in-door and outdoor type scenes, and even combine the two types together. When creating the two types of levels, two rather different approaches are typically used. The traditional contruction tool in the recent mostly indoor games like Quake1/2/3 and Unreal/Unreal Tournament is the brush - a 3D shape, for example a square box. In case of PrismEd, brushes are used in combination with CSG to construct the levels with as few brushes as possible. For outdoor scenes on the other hand, the basic construction element is typically a triangle patch. In fact, a perfectly fine outdoor level will do without a single brush, though you will see that they can be handy for adding many detail things like buildings or bridges etc.
The editor and Virtual File System
- Note that when you add any resource (shader, texture, new folder, whatever), while the editor is running, it won’t notice this. You will need to either restart it, or preferably just use the ”Refresh VFS” command for the editor to notice. Several dialogs where resources are browsed, like shader manager, also have a Refresh VFS button included so that if you have for instance PhotoShop open along with the editor, and save a picture with it, you can make the editor refresh the panel and show the resource to you immediately.
Checking map for potential problems
- File -> Check map for errors command or the F12 key are your friends.. this can spot issues that the engine would either complain about or either crash or not display something properly
- There is a brand new feature in the editor - note to programmers: in the project's edit folder, you should create a file named "entity.chk". In this plain text file, you can list class names of entities that are supposed to be a part of your typical game level. The editor will warn the level designers if it cannot find at least one instance of such entities in their levels. For instance every HU level had to have an "environment" entity in it and some starting positions (note that you are free to create your own version of an entity that would spawn the players into the world instead of the default one) etc. Just make sure that the VFS mounting priority of your game "edit" folder in tools.cfg is higher than that of the global prism3d "edit" folder.
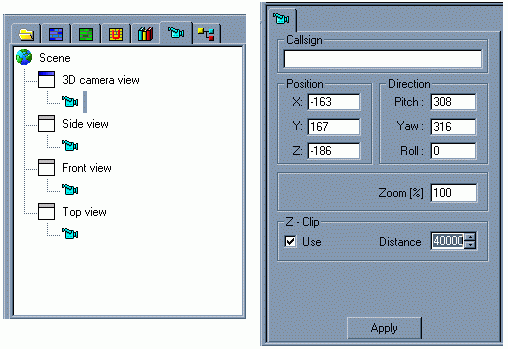
3D camera
- if your map is really huge, you might want to increase the distance of the far clipping plane in the 3D view camera properties. Switch to the ”camera” tab in the ”manager bar”, double click the 3D view camera, and increase the ”Distance” in the z-clip group.
- The default value is suitable for indoor games full of corridors, but of an outdoor level, an increase to tens of thousands of units is not an unreasonable value. Though of course it might cost you some performance in the editor, so do not push too hard.
3. Designing a simple DNMP level
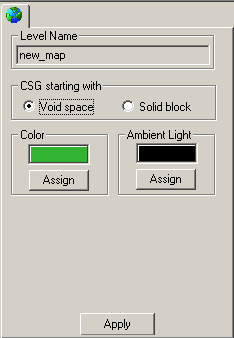
1. As the first thing after you start the editor select the topmost node in the group manager representing the whole level and its properties, and pick the "void space" option.
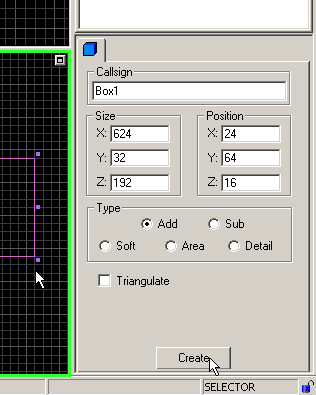
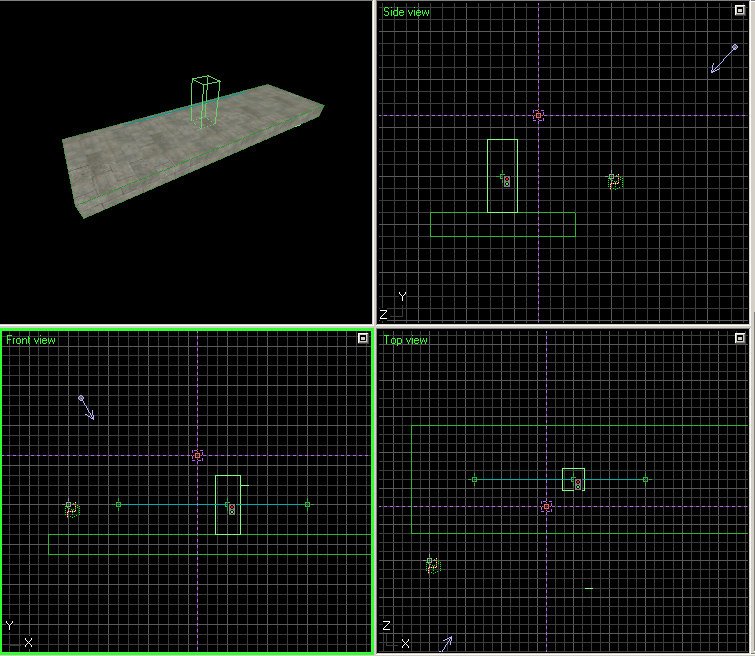
2. We will create a very primitive map consisting of just one "brush", a slab that Duke would be able to walk a short distance left and right. This is the button to press to start creating box brush.
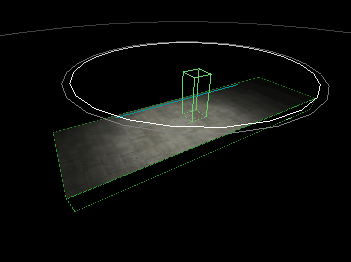
3. After you press the "box" brush button, click (with left mouse button) anywhere inside the 2D wireframe views (either of the Front, Side or Top windows), and drag the mouse cursor before releasing the left mouse button. You should see an outline of the new brush to be constructed. It's not placed into the world yet, this is still just a blueprint you can manipulate with. As we want to create a platform that Duke would walk on, click on the "corner handles" of this bluebrint in the views, and drag them around to form a shape depicted in the picture below. Note that by clicking and dragging with the right mouse button you can manipulate the camera in the views.
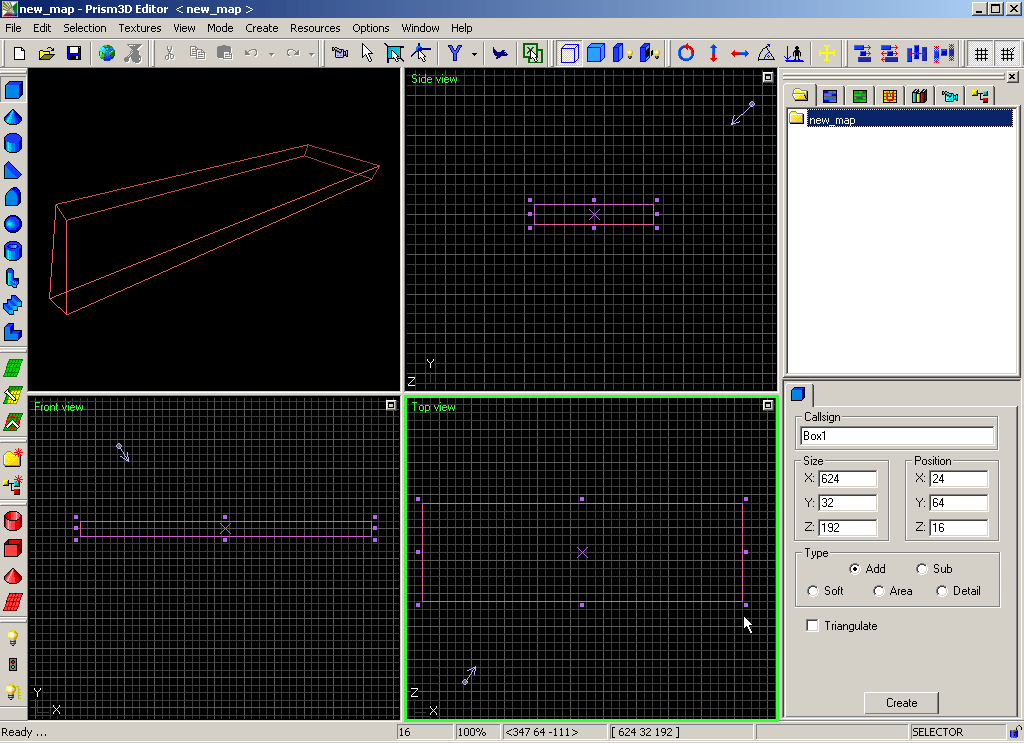
4. Press the "Create" button in the brush properties box, and your blueprint will turn into a real brush placed into the world.
5. Now we'll add a starting position - a place where Duke will appear after the level is started. Press the button looking like a simplified semaphore down left.
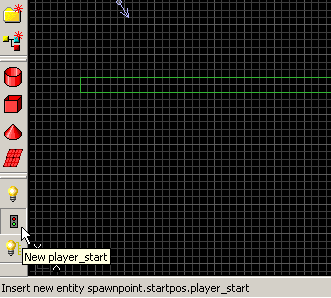
6. Click inside the 2D views to position the cross hair above the platform we have created before. It's still just a blueprint, a "ghost" of things to come at this point, until you press the "Create" button again.
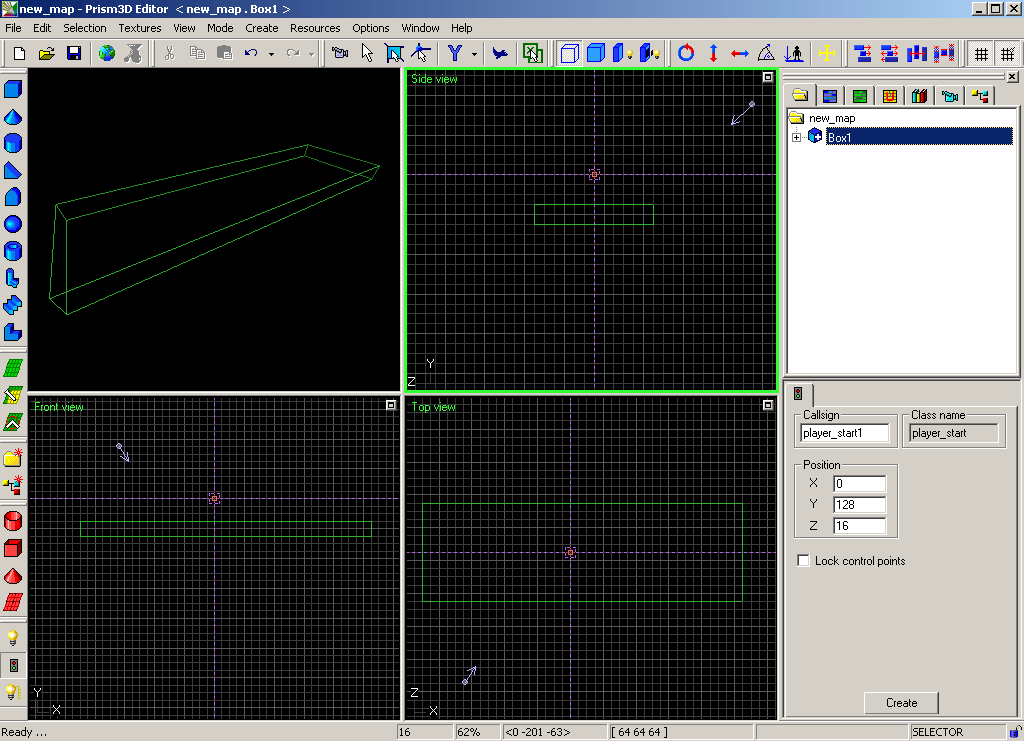
7. After you have pressed Create, the start position entity will be placed into the world, and all of its properties will become accessible. So at this point you will also see the expected bounding box that Duke's character would occupy, and will be able to tell whether you have placed his feet below the ground, or whether you left him hanging in the air. You can fix that by either dragging the entity around in the 2D views with mouse, or by making sure it's selected, and using arrow keys to move it around. You should end up with the bottom of the bounding box neatly aligned with the "floor".
8. However, Duke is looking the wrong direction, at least when compared to the platform we have prepared for him. Click the end of the arrow representing Duke's orientation in the Top View, and rotate it around until he is facing the right direction.
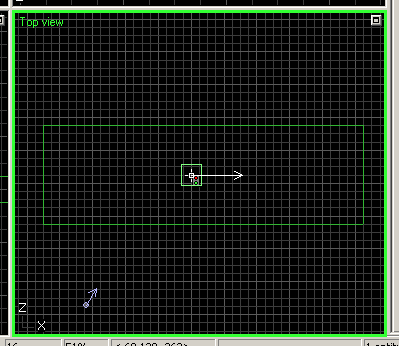
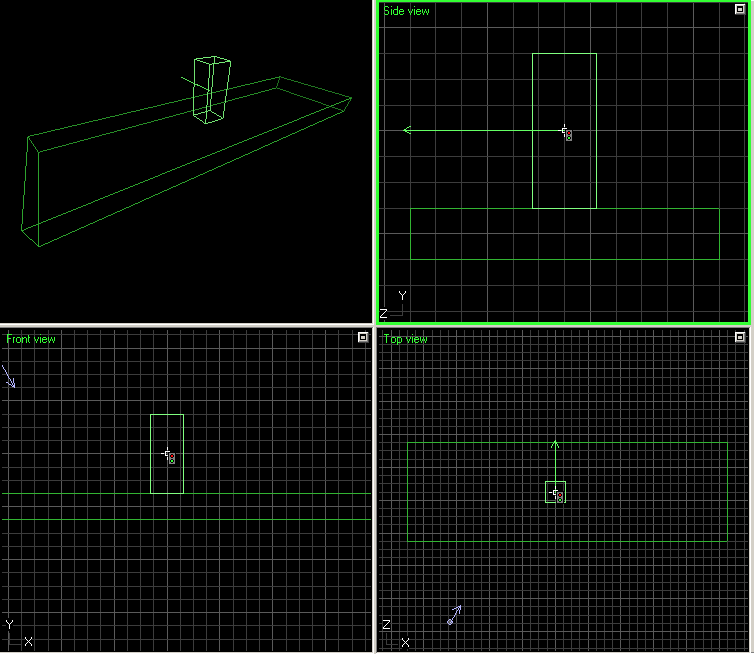
9. Now comes the tricky part. In DNMP, the cameras following Duke are controlled by special entities. No matter where Duke is in the level, there should always be this special entity nearby defining where a camera looking at him is supposed to be. To place this entity into the world, we'll need to open entity browser by clicking the button on the picture below.
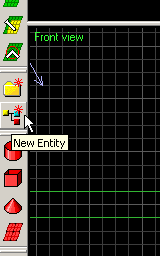
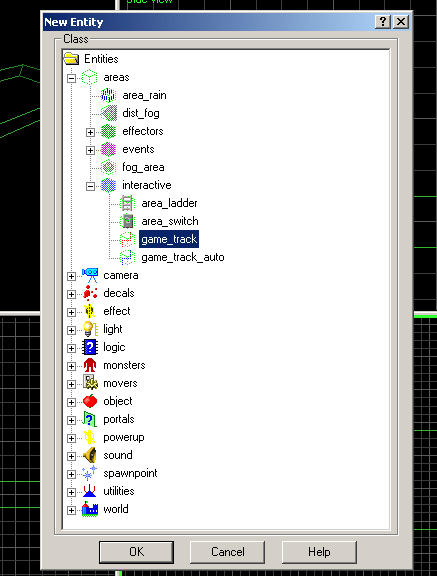
10. This is the entity class browser. There is a bunch of stuff that you will hopefully become familiar over time, for now all we need to do is locate the entity class highlighted in the picture below, and press OK.
11. As with the starting position above, when you click somewhere inside the 2D views now, you will be positioning a "ghost" of the entity that will be created. When you are happy with its position, press Create as usual. It's not that important where this entity will end up really. The position of the entity itself does not in any way affect the placement of the camera, we'll take care of that below, for now we can just place the entity a little distance away from the other things so that it will not get in the way in the future.
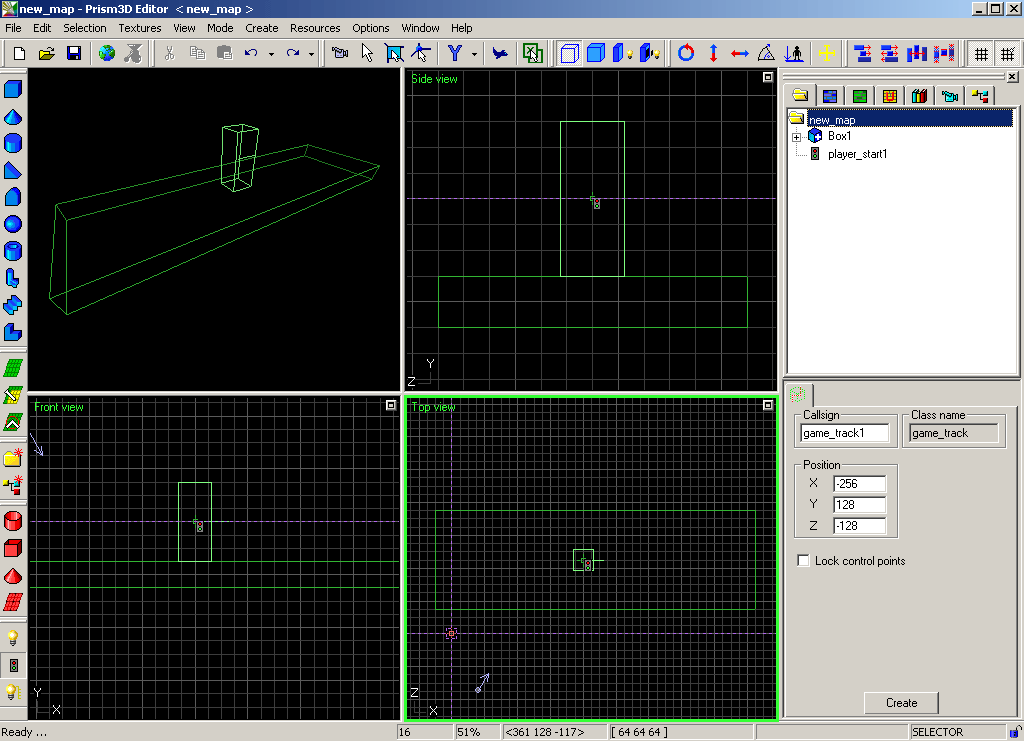
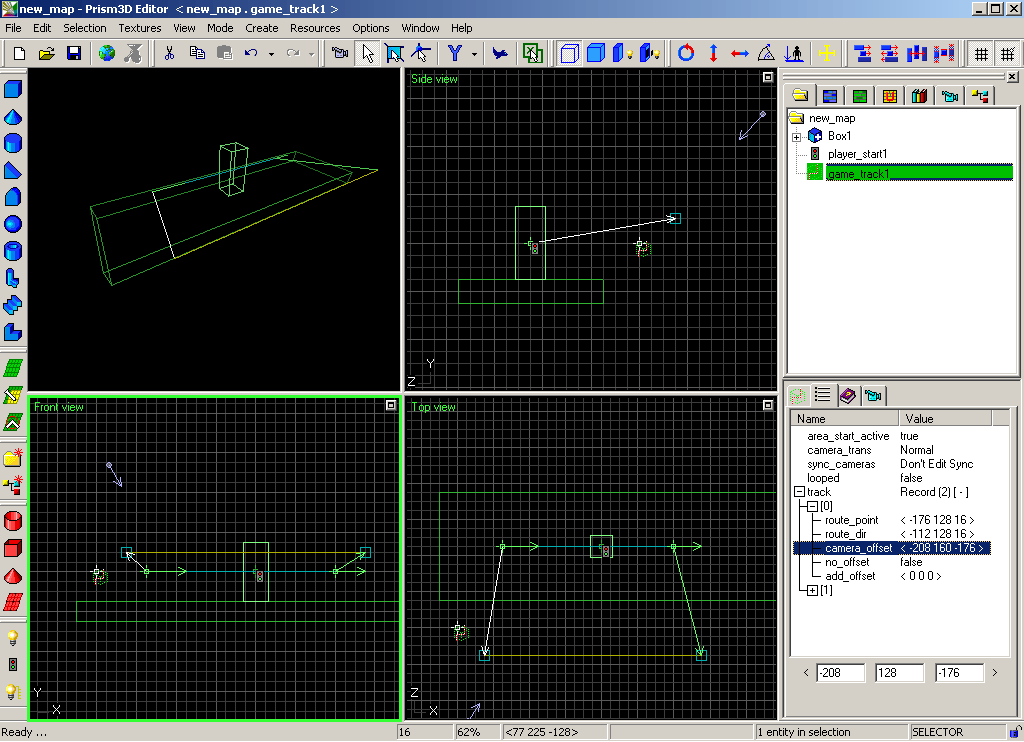
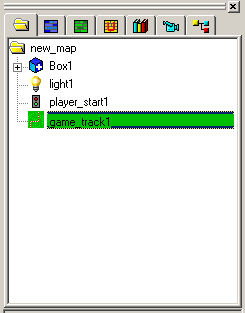
12. Make sure the game_track entity is selected (either click it in the views, or click it in the "group manager". Notice the properties tabs in the bottom right corner of the screen. When you swich to the second tab, there will be a list of entity properties. Select the one named "Track". This is a list of "control points" for the future camera, but so far this list is empty.
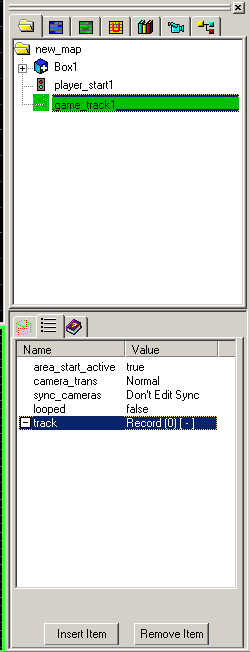
13. Press "Insert Item" twice, and notice that something happens in the views - a bunch of arrows and lines and curves will appear.
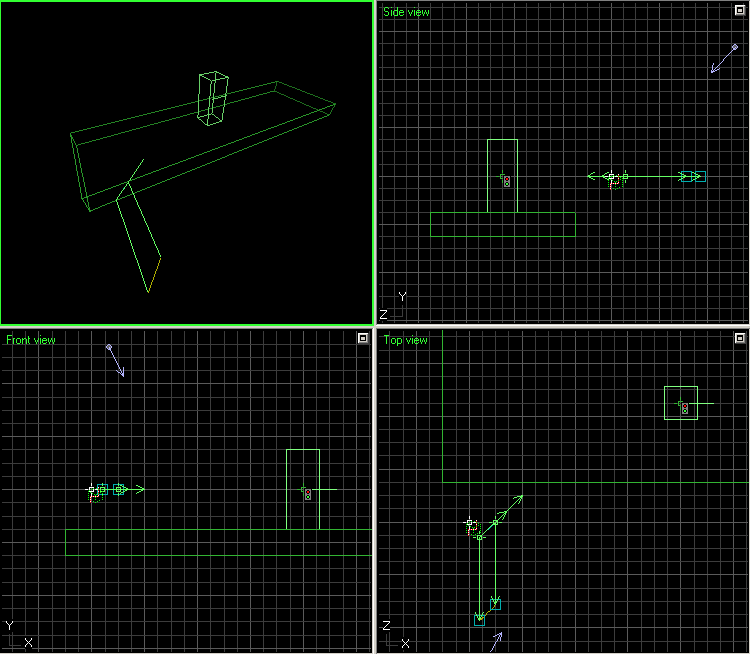
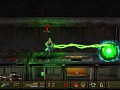
14. These new arrows and handles connected by lines can all be clicked and dragged around in the 2D views. As you do so, notice that various curves will change shape whenever you move a positional handle or direction "arrow" handle. Try to manipulate the handles into the shape pictured below, so that the curves will straighten up. One curve, ochre in color, represents the positions through which the camera should follow Duke along. The teal color curve definies respective position where the camera will aim. By mixing these up, weird things can be done, but right now we only want the simple thing possible to achieve, and that is to stay somewhat focused on Duke, moving along a straight line.
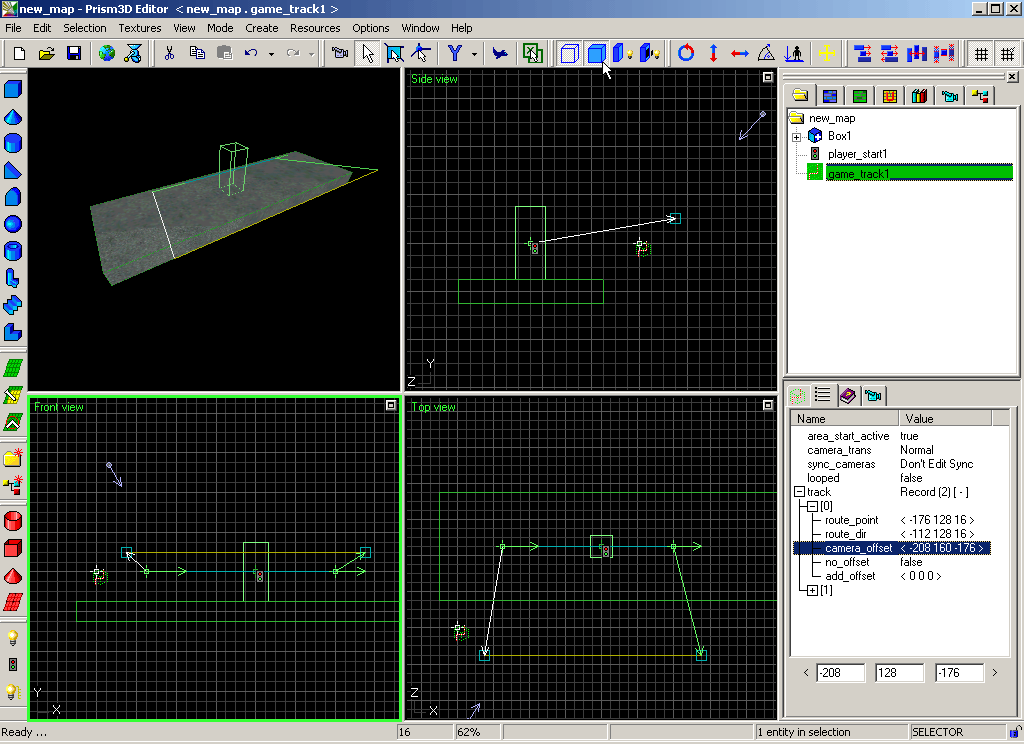
15. Things are coming along well, but we are still working with the wireframe view, maybe it's time to spend some time thinking about what our level will look like, and preview it. Press the "textured preview" button, and see how the brush geometry is now showing the shaders on the surface of the polygons.
16. The default brush texture is not very nice, is it? Let's change it. Select the brush.

17. Switch to the surface properties tab for the brush, and click "Browse".
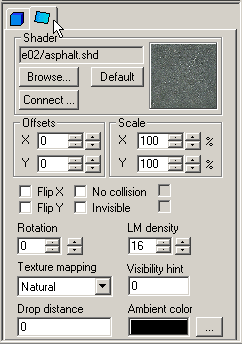
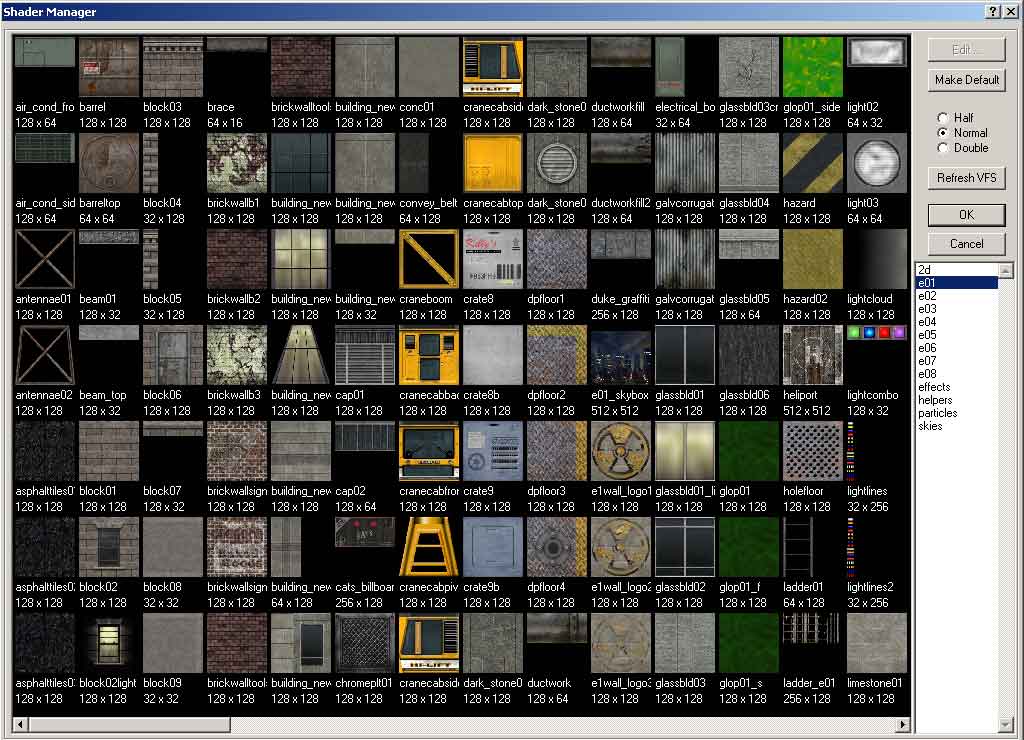
18. Shader browser window will appear. You'll be able to choose from all shaders in the game now. Choose on of the categories on the right (the e01 through e08 are most usefull at this moment, they contain level shaders from the respective episodes), and select a shader. Press OK. You will be back in the editor, and the brush will changed its appearance.
19. It's time to add light into the scene. Click the light bulb button as on the picture below.

20. Once again, you are going to be positioning the "ghost" of the light to be created, and after you have found a suitable position, somewhere near Duke's starting position and above his head, you can press "Create"
21. After you press create, additional properties of the freshly placed entity will become accessible. On of the light properties is it's intensity. This can be changed by manipulating the "reference distance" circle in the 2D views. Click on the green circle around the light and drag it further away from the light - this is making the light stronger.
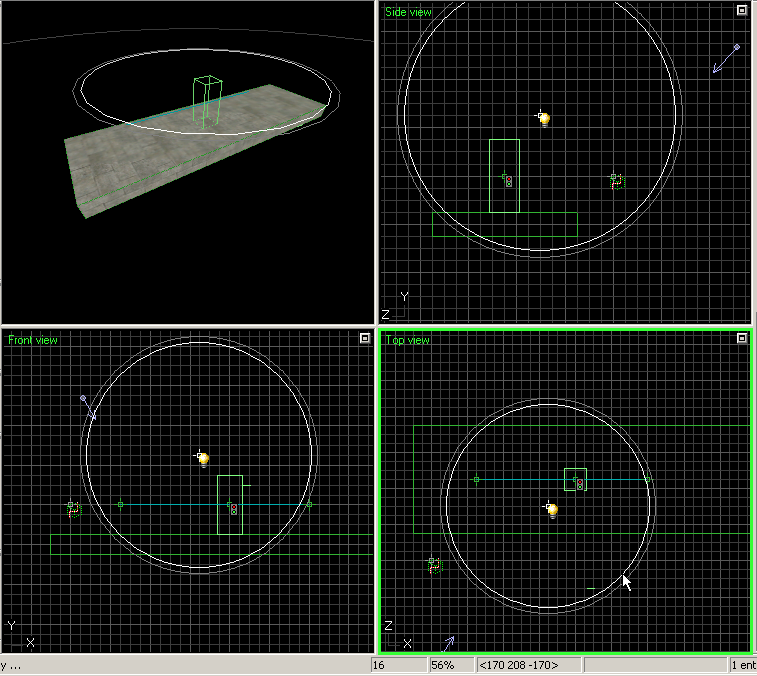
22. But changing light intensity without visual feedback is no fun. You will want to switch to lit preview of the level to see how the light affects the surfaces.
23. There we have it. Is the light strong enough? You decide... whenever you select the light, the circle around it will apear again, and you can change its intensity.
24. We are almost done. But we have forgotten something important in the steps above, and because I am a lazy bastard I won't redo what I have written of the tutorial so far, and just fix it here. This is a typical newbie mistake anyway, so at least this will bring it to your attention to it and you won't make it yourself as well on your next own map.
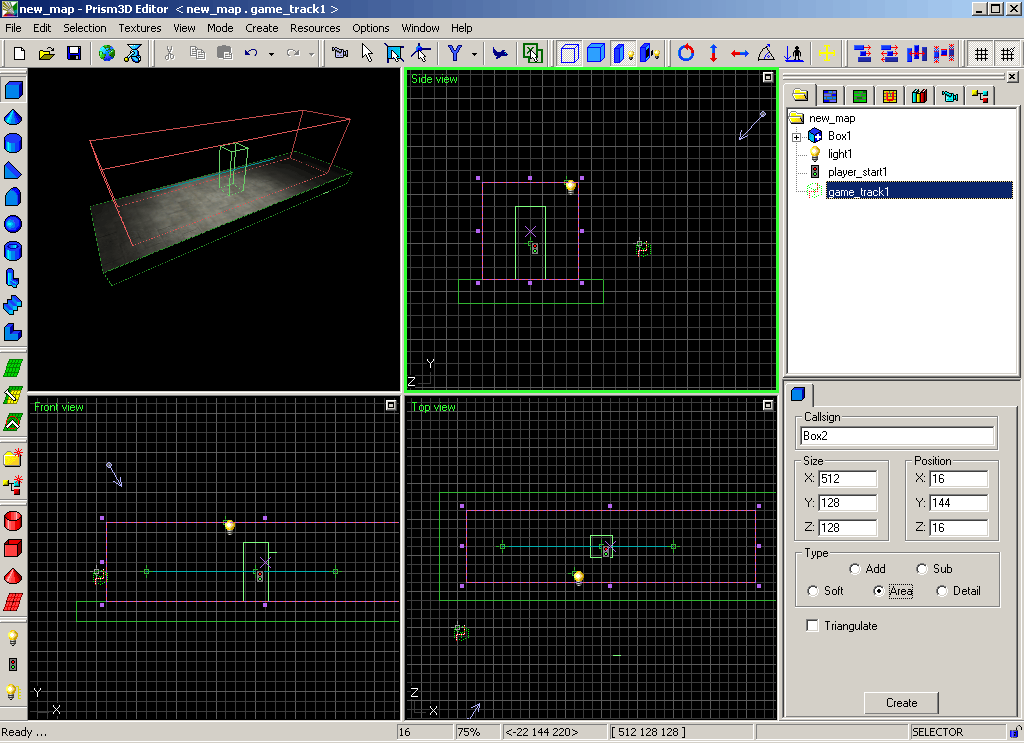
We'll need to go back to the game_track entity. Select it in the group manager again.
25. With the entity selected, press the "box" brush button. We'll need to create a special area-type brush, and have this brush a "child" of the game_track entity in the group manager. This brush defines the space where its camera should handle Duke, so whenever Duke will be in inside this invisible area brush, this one camera will be the one that's looking at it. In our map we only have one camera, but with more complex levels, things can get complicated, and you will want have very clearly defined which camera is used and where. Don't forget to select the "Area" radio button before pressing Create.
26. Now finally we can take a look at our map in the engine - it contains all the elements in needs to be the simplest DNMP map you can possibly build. Press this button to bring up the Build dialog.

28. This is the build dialog. Press the "Build & Run" button.
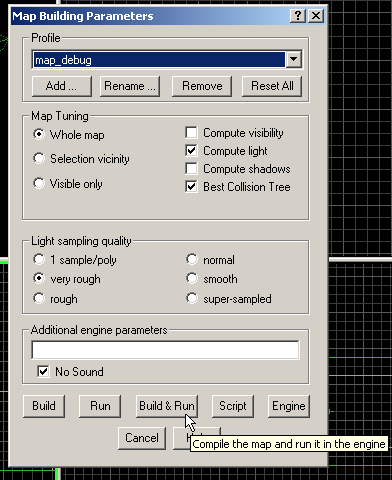
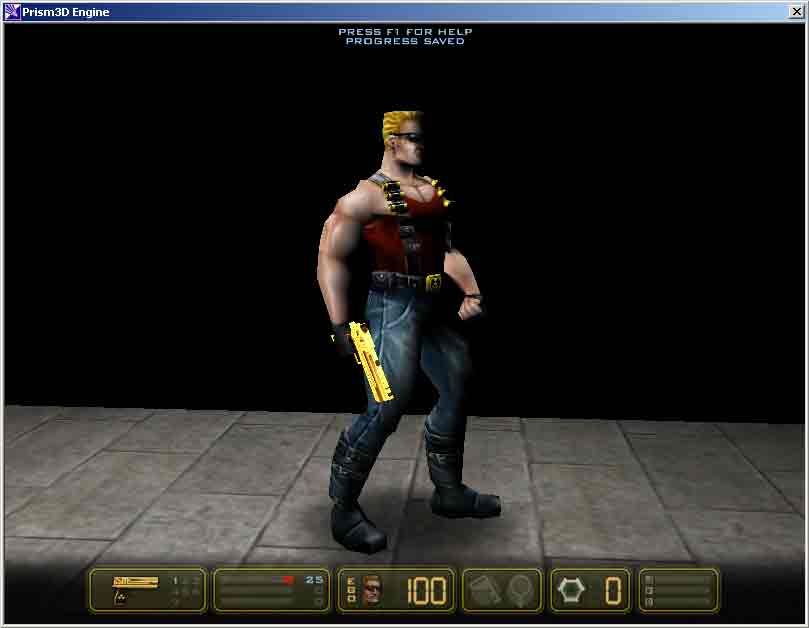
29. And here it is, our very first working level. Congratulations.
4. Frequently Asked Questions
Q: I can't save map source files from the editor, what the hell is going on?
A: The editor & builder suite does not like space characters in the complete path containing the map filename, including map name. This is a legacy problem, a limitation that came to exist due to use of the tools in heterogenous environment over the network, but the important thing for you is to realize that you need to install the engine and of course the editor to a different path than the standard one. For instance "C:\DNMP" is a good one. But the space in "Program Files", or the many spaces in "Duke Nukem - Manhattan Project" are not acceptable for the editor, as well as would be naming a map "My First Map.vex". Stay away from spaces in filenames and paths, and you will be fine. The engine is not limited this way, so the game itself and any user maps can be installed into any folder, but the developments tools have their quirks.
Q: The tutorial was too simple to figure out how to make a more complex map. Could you give us a more detailed overview?
A: Nope. Open one of the many tutorial maps that you will find in the dnmp\duke\map_src folder. There are many examples of how to use and connect entities to create complex behavior in your maps, you should be able to figure it all out. In fact, this tutorial author's knowledge about the intricacies of DNMP entities and proper DNMP map construction are very limited, and probably on the level of most newbies. While the editor was created at SCS Software, the game code, game entities and their logic was all written at Sunstorm, who have heavily customized the engine
Q: When I put my second brush into the map, I can't see it in the textured preview mode. Why?
A: You need to select the topmost, "level" node in the group hierarchy of the map, and change the "CSG starting with" property to "void space". The default property is suitable for indoor maps with lots of corridors and using "sub" brushes to cut those corridords, but this is not the case in many DNMP maps.
Q: Any further tips?
A: When you open the file named DNMP Prism Help.chm that's a part of the editor download package, you will find quite a lot of usefull info there about the editor. The document is worth reading in its entirety, but specifically for the editor usage the sections Technical Info - Key Command Listing and Tips and Tricks are very good. You should also pay attention to the Tip of the Day popups in the editor.
5. Appendix A - terms (very incomplete)
- CSG stands for Constructive Solid geometry - a process to build solid objects from other solid objects using CSG operations. In the case of Prism3D, these operations are addition and subtraction, and are inseparably tied to the solids themselves - the brushes. Other types of geometry - triangle patches and bezier curves - are not solids, so CSG operations do not take them into account, but for brushes, you need to keep the CSG limitations in mind. The most important thing to keep in mind when using CSG in PrismEd is that the ordering of the brushes matters in the map group hierarchy.
- entity - anything "dynamic" or game specific in the map is usually an entity. Entities can mark spots where player and monsters will be spawned, contain information and game logic needed for the level to operatate properly, or be containers for geometry (for example moving platforms), even lights are entities.
- height map - a gray scale image with pixels colors representing the desired height of terrain on a range from minimum (total black) to maximum (total white) height.
- triangle patch - a level construction element suitable for constructing open terrain scenes. Basically a regular grid of triangles at user specified size, each vertex can be positioned independently, but mesh connectivity cannot be changed. Coupled with heightmap import tools can be a very productive tool for open terrain maps, as proved by Hunting Unlimited.
- tripatch see triangle patch
- VFS see Virtual File System
- Virtual File System - in the context of Prism3D, VFS is an abstraction of folder structures and file system that the engine and the tools work with. This allows for the game resources to be stored either in their "normal" state on the local disk or on a network disk, or in compressed form in "zipfs" packages. For VFS to work correctly, you need to set everything right in init.cfg (engine) and tools.cfg (the editor) - the mount points, and the priorities.
Files
Duke Nukem:Manhattan Project - ModLauncher
Full VersionThis is a launcher for Duke Nukem Manhattan Project that allows you to boot into custom mods automatically

Duke Nukem Manhattan Project 1.01 patch
PatchThis is the final update patch for Duke Nukem Manhattan Project. It updates the game to version 1.01
Duke Nukem Manhattan Project sample levels
Mapping ToolSample levels for DNMP. Created by 3D Realms for use with its level editor.
Duke Nukem Manhattan Project Mesh & Bones Editing Tool
Modelling ToolOfficial mesh and bones editing tool for Duke Nukem Manhattan Project
Duke Nukem Manhattan Project level editor
Mapping ToolHere is the official level editor created for Duke Nukem Manhattan Project
Post a comment
Profile
Icon
Developer
Interceptor EntertainmentEngine
CustomContact
Send MessageHomepage
Dukenukemreloaded.comRelease date
Game watch
Follow
Style
Series
Duke Nukem 3D
First Person Shooter
Duke Nukem: Manhattan Project
Platformer
X
Tags
Embed Buttons
Link to Duke Nukem: Manhattan Project by selecting a button and using the embed code provided more...


You may also like

Will You Snail?
Platformer
Mega Man
Platformer
UFO Taxi
Platformer
Errr
Platformer
ScourgeBringer
Platformer
Akimbot
Platformer
Also the icon for this is the Duke Nukem 2 logo...
Now this is just pitiful. The game is DRM-free plenty of other places, so why not here? Because Desura has become weak.
Maybe you should ask Interceptor instead of blaming Desura directly. They may have set up some kind of distributing deal.
Well I blame Desura because I don't think they should really sell games that are just Steam keys at all. I believe their willingness to sell Steam keys is what allowed laziness like this to occur where the game even has a DRM-free version and is still Steam only.
Desura should have a little faith in their own service. I bought games here because I wanted them here and not on Steam. Selling Steam keys just dilutes that and turns Desura into just another Steam key reseller. I've watched the same thing happen to GamersGate...